Linux部署Prometheus监控全家桶

概述

什么是普罗米修斯

普罗米修斯(Prometheus) 是一款开源的系统监控和报警工具包,专为可靠性而设计。它特别适用于对现代云环境或微服务架构中的动态服务进行监控。

特点

普罗米修斯的主要特点是:

支持多维数据模型由指标名称和键值对标识的时间序列数据

  • 多维数据模型:通过指标名称和键值对来标识的时间序列数据。
  • 内置TSDB:拥有自己的时间序列数据库,用于存储监控数据。
  • PromQL支持:一种强大的查询语言,可用于数据分析、图形展示以及监控告警。
  • 自治节点:不依赖分布式存储,每个服务器节点都是独立工作的。
  • HTTP拉取模式:主要采用HTTP协议从目标端拉取监控数据。
  • Pushgateway:允许通过推送方式提交监控数据,适合短期或批量任务。
  • 灵活的目标发现机制:可以通过服务发现或者静态配置两种方式来识别监控目标。
  • 可视化与仪表盘:广泛兼容多种可视化工具,如Grafana等。

核心组件

  • Prometheus Server:负责抓取、存储时序数据,并提供查询接口和告警规则管理。
  • Client Libraries:帮助开发者在应用代码中集成监控功能。
  • Pushgateway:作为中介,允许临时性监控数据被Prometheus采集。
  • Exporters:专门用于收集特定来源的数据,并以标准化格式提供给Prometheus。
  • Alertmanager:处理来自Prometheus的告警通知,支持灵活的通知策略。

基础架构

Prometheus

从这个架构图,也可以看出Prometheus的主要模块包含,Server, Exporters, Pushgateway, PromQL, Alertmanager, WebUl等。

工作流程:

  1. 数据采集:Server 定期从 Exporters 或 Pushgateway 拉取(Pull)指标数据
  2. 存储处理:数据先存入内存缓冲区,持久化至本地 TSDB 或远程存储
  3. 告警处理:通过预置规则定时查询,触发告警推送至 Alertmanager
  4. 告警管理:Alertmanager 执行分组、抑制、路由策略,对接多种通知渠道
  5. 数据消费:通过 Prometheus Web UI、Grafana 或 API 进行数据可视化与查询

核心组件矩阵

组件功能描述
Prometheus Server数据采集、存储、查询处理中心,管理告警规则
Client Libraries支持多语言(SDK for Go/Java/Python等),集成到应用代码进行指标暴露
Pushgateway处理短期任务和批处理作业的指标暂存与中转
Exporters标准化数据采集代理,提供 300+ 官方/社区组件(如 node_exporter, mysql_exporter)
Alertmanager告警管理中心,支持路由、去重、静默、分级通知策略
Grafana可视化平台,提供专业级监控仪表盘配置

数据模型

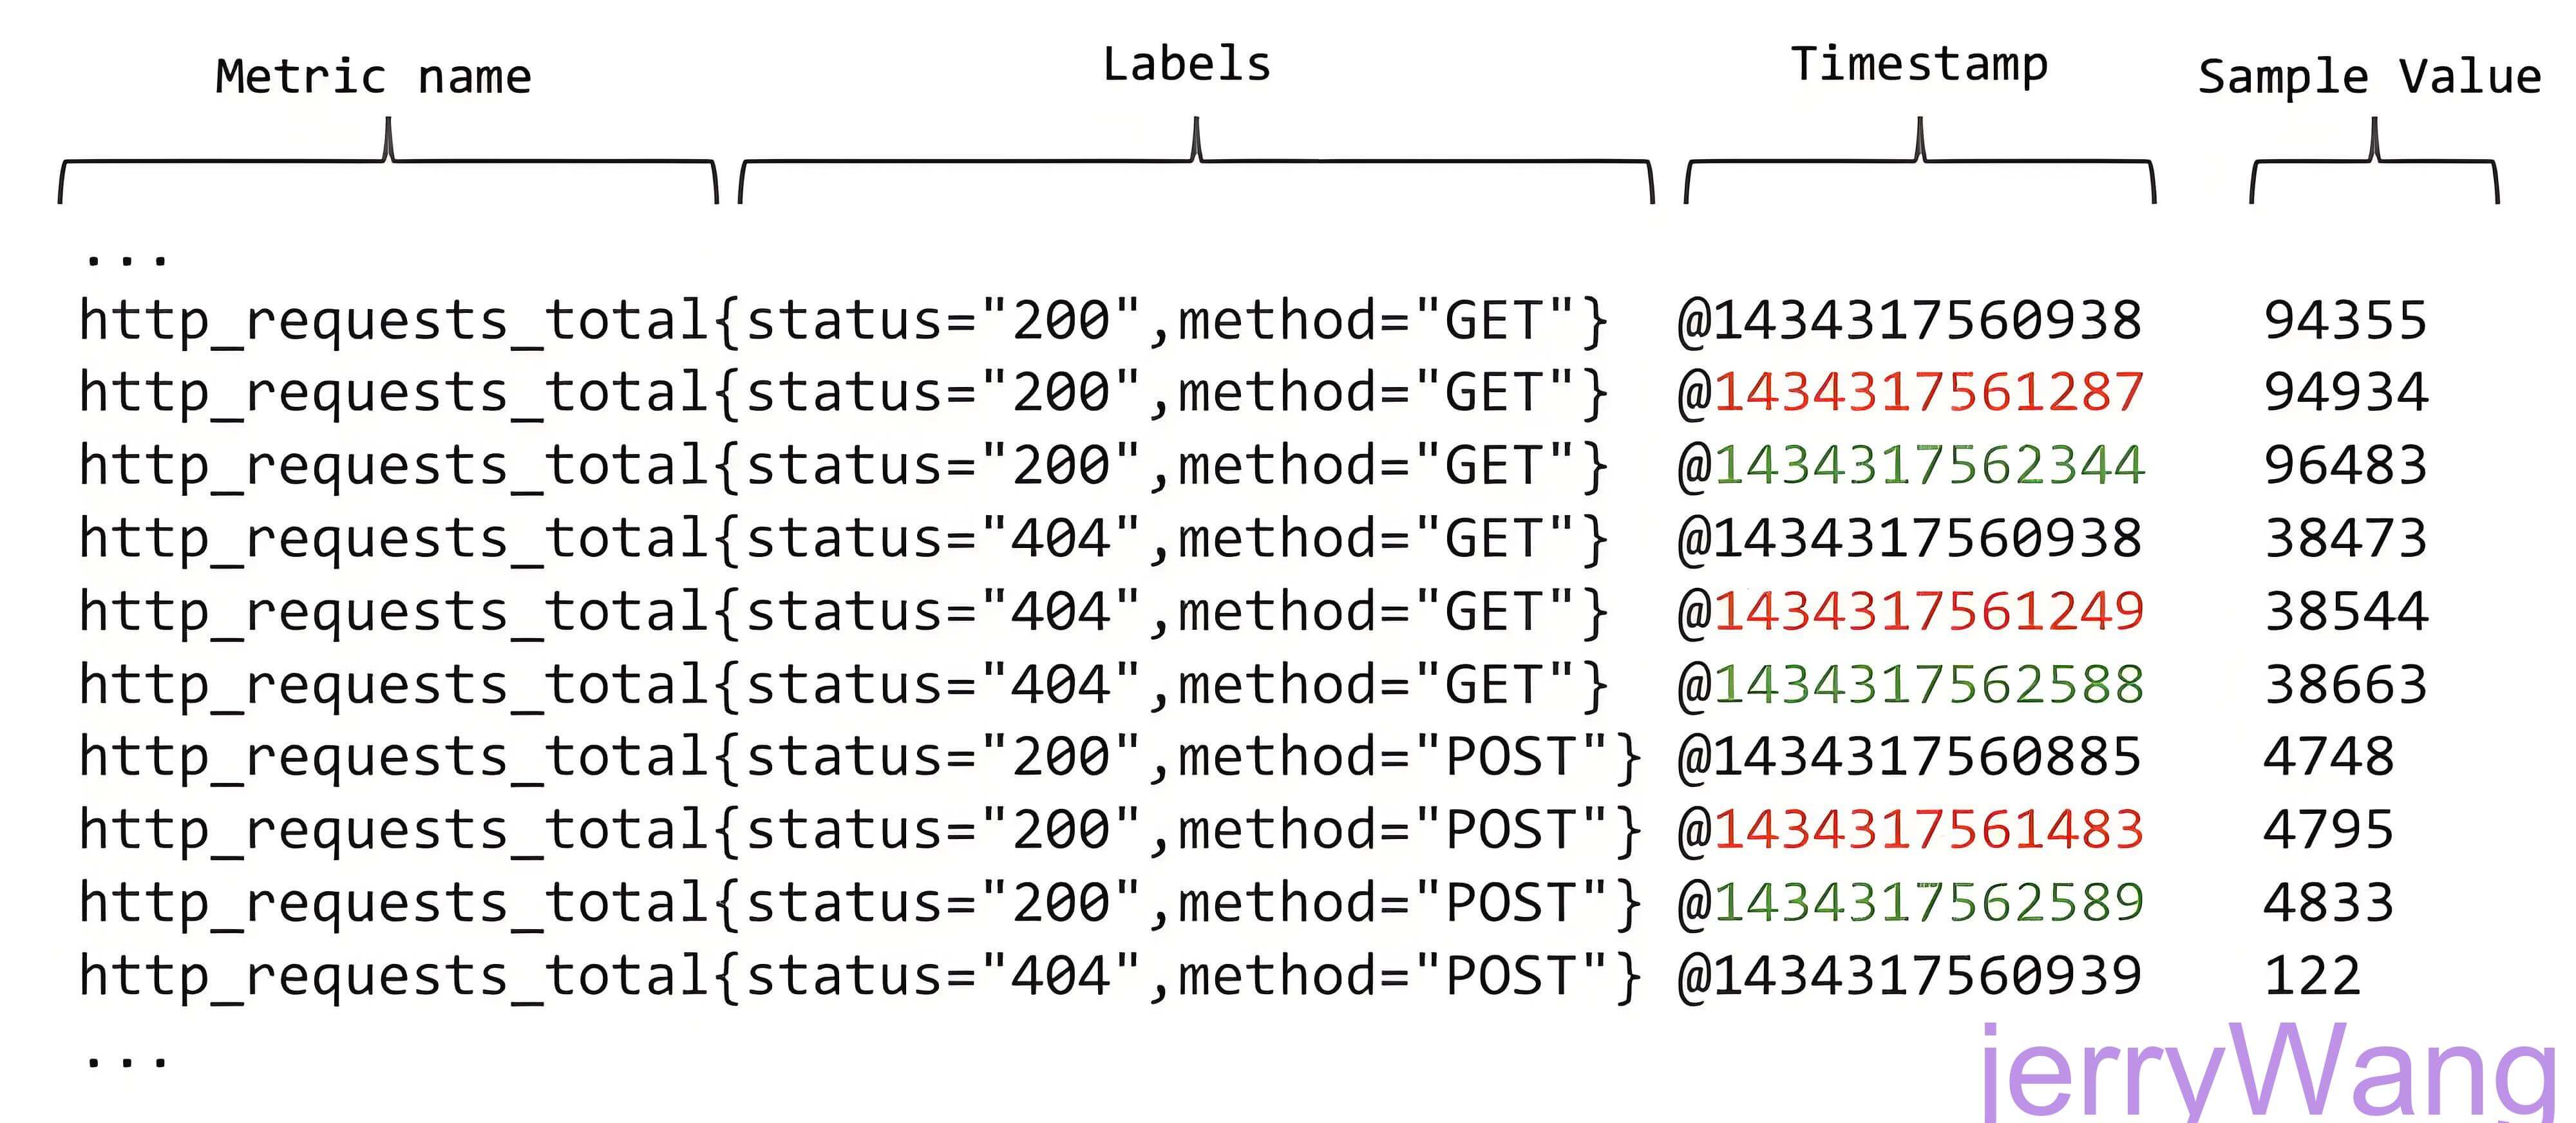
Prometheus 存储的所有数据都是时间序列数据Time Serie Data,简称时序数据)。时序数据是具有时间戳的数据流,该数据流属于某个度量指标(Metric)和该度量指标下的多个标签(Label)。

数据模型

每个Metric name代表了一类的指标,他们可以携带不同的Labels,每个Metric name + Label组合成代表了一条时间序列的数据。

在Prometheus的世界里面,所有的数值都是64bit的。每条时间序列里面记录的其实就是64bit timestamp(时间戳) + 64bit value(采样值)

  • Metric name(指标名称):该名字应该具有语义,一般用于表示 metric 的功能,例如:http_requests_total, 表示 http 请求的总数。其中,metric 名字由 ASCII 字符,数字,下划线,以及冒号组成,且必须满足正则表达式 [a-zA-Z_:][a-zA-Z0-9_:]*。
  • Lables(标签):使同一个时间序列有了不同维度的识别。例如 http_requests_total{method=“Get”} 表示所有 http 请求中的 Get 请求。当 method=“post” 时,则为新的一个 metric。标签中的键由 ASCII 字符,数字,以及下划线组成,且必须满足正则表达式 [a-zA-Z_:][a-zA-Z0-9_:]*。
  • timestamp(时间戳):数据点的时间,表示数据记录的时间。
  • Sample Value(采样值):实际的时间序列,每个序列包括一个 float64 的值和一个毫秒级的时间戳。

例如图上的数据:

1
2
http_requests_total{status="200",method="GET"}
http_requests_total{status="404",method="GET"}

根据上面的分析,时间序列的存储似乎可以设计成key-value存储的方式(基于BigTable)。

任务与实例

  • 用Prometheus术语来说,可以抓取的端点称为instance,通常对应于单个进程。

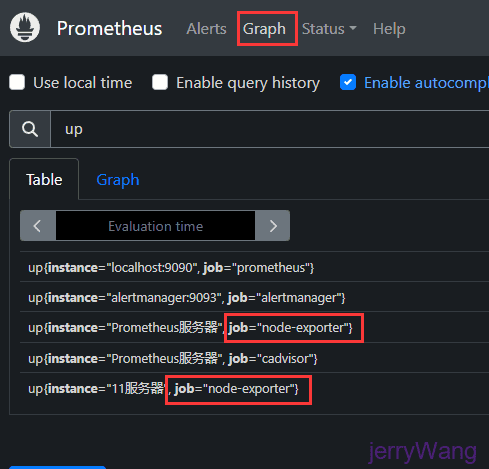
  • 具有相同目的的instances 的集合(例如,出于可伸缩性或可靠性而复制的过程)称为job。

任务job

具有相同采集目的地实例即可成为任务

1
2
3
4
5
6
7
8
9
10
11
12
13
14
15
16
- job_name: 'cadvisor'
scrape_interval: 15s
static_configs:
- targets: ['cadvisor:8080']
labels:
instance: Prometheus服务器

- job_name: 'node-exporter'
scrape_interval: 15s
static_configs:
- targets: ['node_exporter:9100']
labels:
instance: Prometheus服务器
- targets: ['1.1.1.1:9100']
labels:
instance: 11服务器

job

实例instances

通过在prometheus.yml配置文件中,添加如下配置。我们让Prometheus可以从node exporter暴露的服务中获取监控指标数据。

1
2
3
4
5
6
7
8
9
10
11
12
13
14
15
16
17
scrape_configs:
- job_name: 'cadvisor'
scrape_interval: 15s
static_configs:
- targets: ['cadvisor:8080']
labels:
instance: Prometheus服务器

- job_name: 'node-exporter'
scrape_interval: 15s
static_configs:
- targets: ['node_exporter:9100']
labels:
instance: Prometheus服务器
- targets: ['1.1.1.1:9100']
labels:
instance: 11服务器

上面配置的实例都会默认在后面加一个metrics获取监控样本数据,比如1.1.1.1:9100/metrics

实例的状态

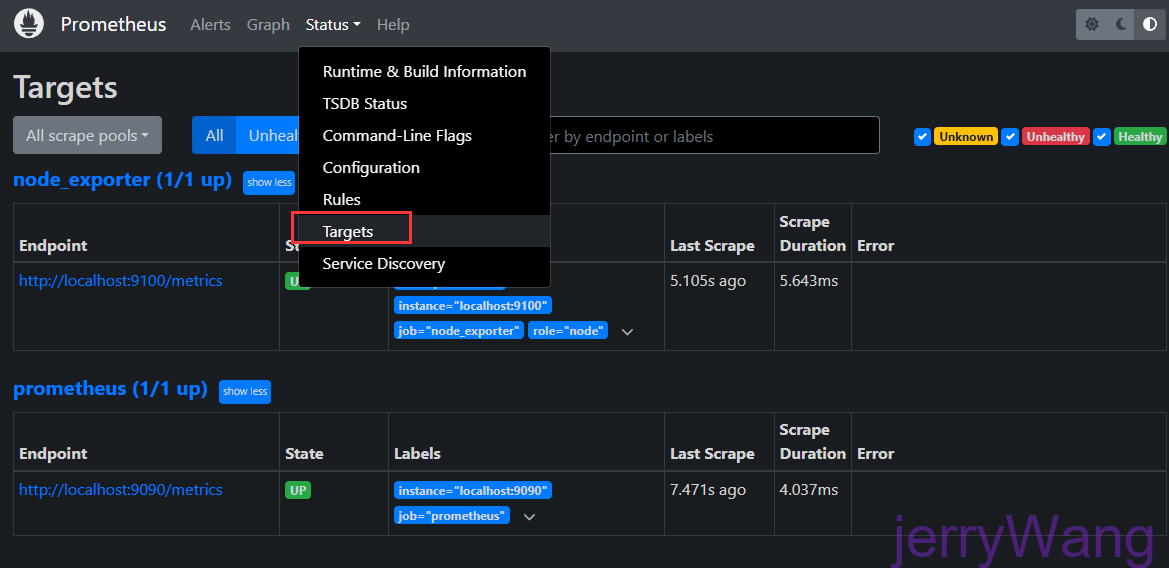
除了通过使用"up"表达式查询当前所有Instance的状态以外,还可以通过Prometheus UI中的Targets页面查看当前所有的监控采集任务,以及各个任务下所有实例的状态:

image-20250311201515663

Zabbix vs Prometheus 功能对比

维度ZabbixPrometheus
架构设计中心化架构(C/S模式)去中心化拉取模型
数据存储关系型数据库(MySQL等)高性能时序数据库(TSDB)
扩展能力通过Agent插件扩展通过Exporters和Client SDK扩展
云原生支持需定制化适配原生支持K8s、OpenStack等云平台
部署规模单实例支持10万+节点(6.0版本后)百万级指标采集能力
查询性能复杂查询效率较低PromQL支持毫秒级响应
配置管理基于Web UI的完整配置体系文件配置+服务发现机制
可视化能力内置成熟报表系统依赖Grafana实现专业可视化
适用场景物理设备/传统IT基础设施监控容器化/微服务/云环境监控

选型建议指南

推荐场景

  1. 优先选择 Zabbix
    • 物理服务器/网络设备监控
    • 需要开箱即用的完整监控方案
    • 传统IT架构环境
  2. 优先选择 Prometheus
    • Kubernetes/Docker容器环境
    • 云原生微服务架构
    • 需要自定义指标和灵活查询的场景

混合部署方案

  • 使用 Zabbix 监控物理基础设施(服务器、交换机等)
  • 使用 Prometheus 监控容器平台和云原生应用
  • 通过 Grafana 统一展示多平台监控数据

技术发展趋势

  • 混合云监控:支持跨云平台统一监控
  • 智能分析:集成机器学习实现异常预测
  • 边缘计算:优化边缘节点监控能力
  • 可观测性:与Tracing/Logging方案深度整合

Exporter介绍

Exporter 是 Prometheus 监控体系中的数据采集代理,其核心作用是将各类监控对象的原生数据转换为 Prometheus 可识别的指标格式。主要特征包括:

特征说明
协议标准化通过 HTTP 暴露 /metrics 端点提供监控数据
数据格式化输出符合 Prometheus 文本格式的指标数据
多场景支持覆盖基础设施、中间件、数据库、应用等全栈监控场景

**注:**安装好Exporter后会暴露-一个 http://ip:端口/metrics的HTTP服务,通过Prometheus添加配置- targets:
[’ node_ exporter:9100’] (默认会加上/metrics) 。Prometheus就可以采集到这个http://ip:端口/metrics里面所有监控样本数据

Exporte的来源

从Exporter的来源上来讲,主要分为两类:

社区的

官方和一些社区提供好多exproter, 我们可以直接拿过来采集我们的数据。 官方的exporter地址: https://prometheus.io/docs/instrumenting/exporters/

Prometheus社区提供了丰富的Exporter实现,涵盖了从基础设施,中间件以及网络等各个方面的监控功能。这些Exporter可以实现大部分通用的监控需求。下表列举一些社区中常用的Exporter:

范围常用Exporter
数据库MySQL Exporter, Redis Exporter, MongoDB Exporter, MSSQL Exporter等
硬件Apcupsd Exporter,IoT Edison Exporter, IPMI Exporter, Node Exporter等
消息队列Beanstalkd Exporter, Kafka Exporter, NSQ Exporter, RabbitMQ Exporter等
存储Ceph Exporter, Gluster Exporter, HDFS Exporter, ScaleIO Exporter等
HTTP服务Apache Exporter, HAProxy Exporter, Nginx Exporter等
API服务AWS ECS Exporter, Docker Cloud Exporter, Docker Hub Exporter, GitHub Exporter等
日志Fluentd Exporter, Grok Exporter等
监控系统Collectd Exporter, Graphite Exporter, InfluxDB Exporter, Nagios Exporter, SNMP Exporter等
其它Blockbox Exporter, JIRA Exporter, Jenkins Exporter, Confluence Exporter等

用户自定义的

除了直接使用社区提供的Exporter程序以外,用户还可以基于Prometheus提供的Client Library创建自己的Exporter程序,目前Promthues社区官方提供了对以下编程语言的支持:Go、Java/Scala、Python、Ruby。同时还有第三方实现的如:Bash、C++、Common Lisp、Erlang,、Haskeel、Lua、Node.js、PHP、Rust等。

常见的Exporter简介

1、blackbox_exporter

GitHub地址:https://github.com/prometheus/blackbox_exporter

bloackbox exporter是prometheus社区提供的黑盒监控解决方案,运行用户通过HTTP、HTTPS、DNS、TCP以及ICMP的方式对网络进行探测。这里通过blackbox对我们的站点信息进行采集。

2、node_exporter(本章重点讲解)

GitHub地址:https://github.com/prometheus/node_exporter

node_exporter主要用来采集机器的性能指标数据,包括cpu,内存,磁盘,io等基本信息。

3、mysqld_exporter

mysql_exporter是用来收集MysQL或者Mariadb数据库相关指标的,mysql_exporter需要连接到数据库并有相关权限。

GitHub地址:https://github.com/prometheus/mysqld_exporter

4、snmp_exporter

SNMP Exporter 从 SNMP 服务中采集信息提供给 Promethers 监控系统使用。

GitHub地址:https://github.com/prometheus/snmp_exporter

Exporter的运行方式

从Exporter的运行方式上来讲,又可以分为:

1、独立运行

由于操作系统本身并不直接支持Prometheus,同时用户也无法通过直接从操作系统层面上提供对Prometheus的支持。因此,用户只能通过独立运行一个程序的方式,通过操作系统提供的相关接口,将系统的运行状态数据转换为可供Prometheus读取的监控数据。 除了Node Exporter以外,比如MySQL Exporter、Redis Exporter等都是通过这种方式实现的。 这些Exporter程序扮演了一个中间代理人的角色(数据转换)

2、集成到应用中(推荐)

为了能够更好的监控系统的内部运行状态,有些开源项目如Kubernetes,ETCD等直接在代码中使用了Prometheus的Client Library,提供了对Prometheus的直接支持。这种方式打破的监控的界限,让应用程序可以直接将内部的运行状态暴露给Prometheus,适合于一些需要更多自定义监控指标需求的项目。

Exporter数据规范

指标数据格式模板

1
2
3
# HELP <指标名称> <描述说明>
# TYPE <指标名称> <指标类型>
<指标名称>{<标签集>} <指标值>

字段说明表

字段必需规范说明
HELP推荐指标功能描述,需保持唯一性
TYPE必须指标类型(Counter/Gauge/Histogram/Summary/Untyped)
指标名称必须符合 [a-zA-Z_:][a-zA-Z0-9_:]* 正则规则
标签集可选键值对格式 label=“value”,多个标签用逗号分隔
指标值必须数值类型(浮点数或整数)

所有的Exporter程序都需要按照Prometheus的规范,返回监控的样本数据。以Node Exporter为例,当访问/metrics地址时会返回以下内容:

以下基于提供的 Node Exporter 示例进行格式验证:

curl -s http://IP:9100/metrics | head -8

1
2
3
4
5
6
7
8
# HELP go_gc_duration_seconds A summary of the wall-time pause (stop-the-world) duration in garbage collection cycles.
# TYPE go_gc_duration_seconds summary
go_gc_duration_seconds{quantile="0"} 2.0065e-05
go_gc_duration_seconds{quantile="0.25"} 2.4378e-05
go_gc_duration_seconds{quantile="0.5"} 3.1889e-05
go_gc_duration_seconds{quantile="0.75"} 4.2855e-05
go_gc_duration_seconds{quantile="1"} 0.000145448
go_gc_duration_seconds_sum 0.297102381
格式要素示例数据合规性说明
HELP 行格式# HELP go_gc_duration_seconds...✔️正确声明指标用途
TYPE 行位置紧接在 HELP 行之后✔️符合 TYPE 必须出现在第一个样本前的规范
指标名称规范go_gc_duration_seconds✔️符合 [a-zA-Z_:][a-zA-Z0-9_:]* 正则规则
标签语法{quantile="0"}✔️键值对使用双引号包裹,符合 label_name="label_value" 格式
数值类型2.0065e-05 (科学计数法表示浮点数)✔️支持整数/浮点数格式
分组排列相同 metric_name 的样本连续排列✔️所有 go_gc_duration_seconds 指标集中展示

Exporter返回的样本数据,主要由三个部分组成:样本的一般注释信息(HELP),样本的类型注释信息(TYPE)和样本

Prometheus会对Exporter响应的内容逐行解析:

  • 以#HELP开始的行,表示metric的帮助与说明注释,可以包含当前监控指标名称和对应的说明信息。
1
# HELP <metrics_name> <doc_string>
  • 以#TYPE开始的行,表示定义metric类型,可以包含当前监控指标名称和类型,类型有Counter. Gauge.Histogram.Summary和Untyped.
1
# TYPE <metrics_name> <metrics_type>

TYPE注释行必须出现在指标的第一个样本之前。如果没有明确的指标类型需要返回为untyped。

  • 非#开头的行,就是监控样本数据
1
2
3
4
5
6
# 合法格式
http_requests{method="POST",status="200"} 42
http_requests{method="POST",status="200",} 42 # 允许结尾逗号

# 非法格式
http_requests{ method = "GET" } 15 # 等号两侧有空格
1
2
3
4
5
6
7
8
# 合法分组
node_cpu_seconds{cpu="0",mode="user"} 1500
node_cpu_seconds{cpu="0",mode="system"} 300

# 非法分组(指标不连续)
node_cpu_seconds{cpu="0",mode="user"} 1500
node_memory_usage 4096
node_cpu_seconds{cpu="1",mode="user"} 1200 # 解析错误

除了# 开头的所有行都会被视为是监控样本数据。 每一行样本需要满足以上格式规范

官网安装

Prometheus

官网安装:Prometheus - Monitoring system & time series database

GitHub安装:GitHub - prometheus/prometheus: The Prometheus monitoring system and time series database.

  1. 选择its(长期稳定维护)版本,架构选择amd64(x86_64)
1
2
3
4
5
6
7
8
9
10
11
12
13
14
15
# 使用变量管理版本号,便于升级
VERSION="2.53.3"
# 下载 Prometheus 二进制压缩包
wget https://github.com/prometheus/prometheus/releases/download/v${VERSION}/prometheus-${VERSION}.linux-amd64.tar.gz
# 解压
tar zxf prometheus-${VERSION}.linux-amd64.tar.gz
# 创建统一存放目录 /opt/prometheus/ 之后回存放安装 Prometheus、Alertmanager、Grafana、node_exporter
mkdir -p /opt/prometheus/
# 重命名
mv prometheus-${VERSION}.linux-amd64 /opt/prometheus/prometheus
# 创建专门的prometheus用户 禁止登录系统
useradd -M -s /usr/sbin/nologin prometheus
# 新增数据目录创建与授权
mkdir -p /opt/prometheus/prometheus/data
chown -R prometheus:prometheus /opt/prometheus/
  1. 检查用户是否创建成功 两种方法
1
2
3
4
5
6
# 1
id prometheus
uid=1003(prometheus) gid=1003(prometheus) þ=1003(prometheus)
# 2
cat /etc/passwd | grep prometheus
prometheus:x:1003:1003::/home/prometheus:/usr/sbin/nologin
  1. 创建systemd服务
1
2
3
4
5
6
7
8
9
10
11
12
13
14
15
16
17
18
19
20
21
22
23
24
25
26
27
cat > /etc/systemd/system/prometheus.service << 'EOF'
[Unit]
Description=Prometheus Server
Documentation=https://prometheus.io/docs/introduction/overview/
After=network-online.target
Wants=network-online.target

[Service]
Type=simple
User=prometheus
Group=prometheus
Restart=on-failure
ExecStart=/opt/prometheus/prometheus/prometheus \
--config.file=/opt/prometheus/prometheus/prometheus.yml \
--storage.tsdb.path=/opt/prometheus/prometheus/data \
--storage.tsdb.retention.time=60d \
--web.enable-lifecycle \
--web.listen-address=0.0.0.0:9090
LimitNOFILE=65536
StandardOutput=journal
StandardError=journal

[Install]
WantedBy=multi-user.target
EOF
# 确保权限 再次授权
chown -R prometheus:prometheus /opt/prometheus/
  1. 启动prometheus
1
2
3
4
5
6
7
8
9
10
11
12
13
14
# 应用所有配置后执行
systemctl daemon-reload
# 将服务设置为在系统启动时自动启动, --now: 立即启动该服务
systemctl enable --now prometheus
# 查看状态
systemctl status prometheus
# 验证服务端口
ss -tunlp | grep 9090
# 使用 journalctl 查看 Prometheus 服务的详细日志,以获取更多的错误信息
journalctl -u prometheus.service
# 或者查看最近的日志
journalctl -u prometheus.service --since "5 minutes ago"
# 重启prometheus
systemctl restart prometheus
  1. 访问地址
应用地址
prometheushttp://IP:9090/
监控指标http://IP:9090/metrics

Unit 部分

  • Description: 提供了对服务的简短描述,这里是“Prometheus Server”。
  • Documentation: 提供了指向官方文档的链接,帮助用户了解更多信息。
  • After: 指定了此服务应在 network-online.target 启动之后启动,确保网络已完全初始化后再启动 Prometheus。
  • Wants: 表示希望 network-online.target 也处于活动状态,但不会强制要求它必须成功启动。

Service 部分

  • Type=simple: 表示当 ExecStart 所指定的进程开始后,即认为服务已经启动成功。
  • User 和 Group: 指定运行 Prometheus 服务的用户和组,这里为 prometheus 用户和组。这有助于安全性和权限管理。
  • Restart=on-failure: 如果服务因错误退出,则会自动重启。
  • ExecStart: 定义启动 Prometheus 的命令及其参数:
    • --config.file: 指定 Prometheus 配置文件的位置。
    • --storage.tsdb.path: 设置 TSDB 数据存储路径。
    • --storage.tsdb.retention.time: 设置数据保留时间为60天。
    • --web.enable-lifecycle: 启用 HTTP 生命周期 API,允许通过 HTTP 请求动态重新加载配置或关闭 Prometheus。
    • --web.listen-address: 设置 Prometheus Web UI 和 API 的监听地址及端口。
  • LimitNOFILE=65536: 设置最大打开文件描述符的数量,这对于高负载下的 Prometheus 实例非常重要。
  • StandardOutput 和 StandardError: 将标准输出和标准错误都重定向到 systemd 的日志(journal)中,便于管理和查看日志信息。

Install 部分

  • WantedBy: 指定该服务属于哪个目标(target)。在这里,multi-user.target 是大多数服务器系统的默认运行级别,相当于传统的 runlevel 3,表示非图形界面的多用户模式。这意味着当你启用这个服务时,它会在系统进入多用户模式时自动启动。

总结

这个配置文件定义了一个名为 prometheus.service 的 systemd 服务,用于在系统启动时自动启动 Prometheus,并且配置了适当的运行参数、用户权限、日志记录等。通过这种方式,可以方便地管理系统中的 Prometheus 服务,包括启动、停止、重启以及查看状态等操作。同时,合理的配置还能确保服务的稳定性和安全性。

Alertmanager

Alertmanager 核心介绍

Alertmanager 是 Prometheus 生态的告警管理中心,主要负责:

功能说明
告警聚合将同类告警合并为单个通知,避免告警风暴
路由分发根据标签将告警路由到不同的接收端(邮件/Slack/钉钉等)
静默管理通过时间窗口或匹配规则临时屏蔽特定告警
告警抑制当高级别告警触发时,自动抑制低级别相关告警
重试机制在通知失败时自动重试发送
状态持久化存储告警状态,确保服务重启后不丢失上下文

安装必要性分析

场景是否需要安装说明
仅需指标采集Prometheus Server 本身支持基础告警规则配置
生产环境告警管理必需组件,提供企业级告警生命周期管理
多通知渠道集成支持同时对接邮件、钉钉、企业微信等10+种通知方式
复杂告警策略需要分组、抑制、静默等高级功能时必需

架构示意图

1
2
3
4
5
6
7
8
9
Prometheus Server

▼ 触发告警
AlertManager

├──▶ 邮件通知
├──▶ Slack通知
├──▶ 钉钉机器人
└──▶ 自定义Webhook
  1. 安装

地址:GitHub - prometheus/alertmanager: Prometheus Alertmanager

1
2
3
4
5
6
7
8
9
10
11
# 使用变量管理版本
VERSION="0.28.1"
# 下载
wget https://github.com/prometheus/alertmanager/releases/download/v${VERSION}/alertmanager-${VERSION}.linux-amd64.tar.gz
# 解压
tar zxf alertmanager-${VERSION}.linux-amd64.tar.gz
# 重命名
mv alertmanager-${VERSION}.linux-amd64 /opt/prometheus/alertmanager
# 创建数据目录并授权
mkdir -p /opt/prometheus/alertmanager/data
chown -R prometheus:prometheus /opt/prometheus/
  1. 创建systemd服务
1
2
3
4
5
6
7
8
9
10
11
12
13
14
15
16
17
18
19
20
21
22
23
cat > /etc/systemd/system/alertmanager.service << 'EOF'
[Unit]
Description=Alert Manager
Documentation=https://prometheus.io/docs/alerting/latest/alertmanager/
Wants=network-online.target
After=network-online.target

[Service]
Type=simple
User=prometheus
Group=prometheus
ExecStart=/opt/prometheus/alertmanager/alertmanager \
--config.file=/opt/prometheus/alertmanager/alertmanager.yml \
--storage.path=/opt/prometheus/alertmanager/data \
--web.listen-address=0.0.0.0:9093
Restart=always
LimitNOFILE=65536
StandardOutput=journal
StandardError=journal

[Install]
WantedBy=multi-user.target
EOF
  1. 启动
1
2
3
4
5
6
7
8
9
10
11
12
13
14
# 重载服务配置
systemctl daemon-reload

# 启动服务
systemctl enable --now alertmanager

# 验证端口
ss -tunlp | grep 9093

# 查看日志
journalctl -u alertmanager -f --since "2 minutes ago"

# Web控制台访问
http://<SERVER_IP>:9093
  1. Prometheus 服务端prometheus.yml关联配置

1、解除注释,因为Prometheus 和 alertmanagers 安装在同一台机器上修改alertmanagerlocalhost

2、增加触发器配置文件 - "alert.yml"注意缩进,可以自定义文件名

1
2
3
4
5
6
7
8
9
10
11
12
# Alertmanager configuration
alerting:
alertmanagers:
- static_configs:
- targets:
- localhost:9093

# Load rules once and periodically evaluate them according to the global 'evaluation_interval'.
rule_files:
- "alert.yml"
# - "first_rules.yml"
# - "second_rules.yml"

3、增加触发器配置文件

1
2
3
4
5
6
7
8
9
10
11
12
13
14
cat > /opt/prometheus/prometheus/alert.yml << 'EOF'
groups:
- name: Prometheus alert
rules:
- alert: 服务告警
expr: up{job!="alertmanager"} == 0 # 排除自身监控
for: 3m # 延长检测时间避免抖动
labels:
severity: critical
region: "{{ $labels.instance }}"
annotations:
summary: "服务实例 {{ $labels.instance }} 故障"
description: "{{ $labels.job }} 在 {{ $labels.instance }} 已宕机超过3分钟"
EOF

4、检查配置

1
2
3
4
5
6
7
8
9
10
11
12
13
# 进入安装目录
cd /opt/prometheus/prometheus

# 使用 promtool 检查配置(需确认工具存在)
./promtool check config prometheus.yml

# 预期输出:
Checking prometheus.yml
SUCCESS: 1 rule files found
SUCCESS: prometheus.yml is valid prometheus config file syntax

Checking alert.yml
SUCCESS: 1 rules found

5、重启prometheus或者安全热加载流程

1
2
3
4
5
6
7
8
# 方法1:通过API热加载(需启动时启用 --web.enable-lifecycle)
curl -X POST http://localhost:9090/-/reload

# 方法2:通过systemd重启(保证配置持久化)
systemctl restart prometheus

# 验证规则加载
curl http://localhost:9090/api/v1/rules | jq .

Alertmanager

Grafana

安装

官网下载地址:Download Grafana | Grafana Labs

1
2
3
4
5
6
7
8
9
# 使用变量管理版本
VERSION="11.5.2"
wget https://dl.grafana.com/enterprise/release/grafana-enterprise-${VERSION}.linux-amd64.tar.gz
tar -zxvf grafana-enterprise-${VERSION}.linux-amd64.tar.gz
mv grafana-${VERSION} /opt/prometheus/grafana

# 创建必要目录并授权
mkdir -p /opt/prometheus/grafana/{data,logs}
chown -R prometheus:prometheus /opt/prometheus/

创建systemd服务

1
2
3
4
5
6
7
8
9
10
11
12
13
14
15
16
17
18
19
20
21
22
23
24
25
26
cat > /etc/systemd/system/grafana.service << 'EOF'
[Unit]
Description=Grafana Server
Documentation=https://grafana.com/docs/
After=network-online.target
Wants=network-online.target

[Service]
Type=simple
User=prometheus
Group=prometheus
Environment="GF_PATHS_HOME=/opt/prometheus/grafana"
Environment="GF_PATHS_CONFIG=/opt/prometheus/grafana/conf"
Environment="GF_PATHS_DATA=/opt/prometheus/grafana/data"
Environment="GF_PATHS_LOGS=/opt/prometheus/grafana/logs"
ExecStart=/opt/prometheus/grafana/bin/grafana-server \
--config=/opt/prometheus/grafana/conf/defaults.ini \
--homepath=/opt/prometheus/grafana
LimitNOFILE=65536
Restart=on-failure
StandardOutput=journal
StandardError=journal

[Install]
WantedBy=multi-user.target
EOF

启动grafana

1
2
3
4
5
6
7
8
9
10
11
12
13
14
# 应用配置
systemctl daemon-reload
systemctl enable --now grafana
systemctl status grafana

# 验证端口
ss -tunlp | grep 3000

# 查看日志
journalctl -u grafana -f --since "2 minutes ago"

# 初始访问
echo "访问地址:http://$(hostname -I | awk '{print $1}'):3000"
echo "初始账号:admin/admin(首次登录需修改)"

生产环境建议

修改/opt/prometheus/grafana/conf/defaults.ini

启用 HTTPS

1
2
3
4
[server]
protocol = https
cert_file = /path/to/cert.pem
cert_key = /path/to/key.pem

配置匿名访问限制

1
2
[auth.anonymous]
enabled = false
配置项推荐值说明
数据保留周期90d控制监控数据存储规模
日志轮转策略每日压缩归档防止日志文件过大
备份策略每日备份 /opt/prometheus/grafana/data确保配置和仪表盘安全
监控自监控添加 Grafana 自身监控通过 Prometheus 监控 Grafana 状态

Node_exporter

  1. 安装
1
2
3
4
5
6
7
8
9
10
11
12
13
14
# 使用变量管理版本
VERSION="1.9.0"
wget https://github.com/prometheus/node_exporter/releases/download/v${VERSION}/node_exporter-${VERSION}.linux-amd64.tar.gz
tar zxf node_exporter-${VERSION}.linux-amd64.tar.gz
[ -d /opt/prometheus/ ] || mkdir -p /opt/prometheus/
mv node_exporter-${VERSION}.linux-amd64 /opt/prometheus/node_exporter

# 同Prometheus机器一台或者已经有prometheus用户忽略此操作
# 创建专门的prometheus用户 禁止登录系统
cat /etc/passwd | grep -q prometheus || useradd -M -s /usr/sbin/nologin prometheus

# 创建数据目录并授权
mkdir -p /opt/prometheus/node_exporter/data
chown -R prometheus:prometheus /opt/prometheus/
  1. 创建systemd服务
1
2
3
4
5
6
7
8
9
10
11
12
13
14
15
16
17
18
19
20
21
22
cat > /etc/systemd/system/node_exporter.service << 'EOF'
[Unit]
Description=Node Exporter
Documentation=https://prometheus.io/docs/guides/node-exporter/
After=network.target

[Service]
User=prometheus
Group=prometheus
ExecStart=/opt/prometheus/node_exporter/node_exporter \
--web.listen-address=0.0.0.0:9100 \
--collector.systemd \
--collector.systemd.unit-whitelist="(ssh|docker|prometheus).service"
Restart=on-failure
RestartSec=30s
LimitNOFILE=65536
StandardOutput=journal
StandardError=journal

[Install]
WantedBy=multi-user.target
EOF
  1. 启动node_exporter
1
2
3
4
5
6
7
8
9
10
11
12
# 应用配置
systemctl daemon-reload
systemctl enable --now node_exporter
systemctl status node_exporter
# 验证端口
ss -tunlp | grep 9100

# 指标采集测试
curl -s http://localhost:9100/metrics | grep 'node_'

# 查看日志
journalctl -u node_exporter -f --since "2 minutes ago"

web访问地址http://IP:9100/metrics

  1. 修改Prometheus配置

vim /opt/prometheus/prometheus/prometheus.yml

1
2
3
4
5
6
7
8
9
10
11
12
13
14
15
16
17
18
19
20
21
scrape_configs:
# The job name is added as a label `job=<job_name>` to any timeseries scraped from this config.
- job_name: "prometheus"

# metrics_path defaults to '/metrics'
# scheme defaults to 'http'.

static_configs:
- targets: ["localhost:9090"]
# 加入下面这一行 node_exporter组名可以随意起对自己有意义的
- job_name: 'node_exporter'
static_configs:
- targets: ['localhost:9100']
labels:
env: 'production'
role: 'node'
instance: admin服务器
# 下面可以继续添加其他服务器的node节点到node_exporter这个组里,可以简化也可以细则话添加labels相关信息
- targets: ['192.168.1.101:9100']
- targets: ['192.168.1.102:9100']
- targets: ['192.168.1.103:9100']

热加载配置

1
curl -X POST http://localhost:9090/-/reload

页面验证

image-20250311201515663

centos 6.x低系统版本安装

1
2
3
4
5
6
7
8
9
10
11
12
13
14
15
16
17
# 定义版本变量
VERSION="1.9.0"

# 下载并解压(注意:CentOS 6默认无wget需安装)
yum install -y wget
wget https://github.com/prometheus/node_exporter/releases/download/v${VERSION}/node_exporter-${VERSION}.linux-amd64.tar.gz
tar zxf node_exporter-${VERSION}.linux-amd64.tar.gz

# 移动二进制文件到标准路径(修正原文档路径错误)
mv node_exporter-${VERSION}.linux-amd64/node_exporter /usr/local/bin/

# 创建专用系统用户
useradd --no-create-home --shell /sbin/nologin node_exporter

# 设置二进制文件权限
chown node_exporter:node_exporter /usr/local/bin/node_exporter
chmod 755 /usr/local/bin/node_exporter

vi /etc/init.d/node_exporter

1
2
3
4
5
6
7
8
9
10
11
12
13
14
15
16
17
18
19
20
21
22
23
24
25
26
27
28
29
30
31
32
33
34
35
36
37
38
39
40
41
42
43
44
45
46
47
48
49
50
51
52
53
54
55
56
57
58
59
60
61
62
63
64
65
66
67
68
69
70
#!/bin/bash
### BEGIN INIT INFO
# 提供的服务: node_exporter
# 需要启动的服务: $network $syslog - 确保在网络和日志服务启动后再启动 node_exporter
# 需要停止的服务: $network $syslog - 在停止 node_exporter 前确保网络和日志服务已停止
# 默认启动级别: 2 3 4 5 - 多用户模式和图形界面模式下自动启动
# 默认停止级别: 0 1 6 - 关机、单用户模式和重启时自动停止
# 简短描述: Prometheus Node Exporter - 监控系统硬件和操作系统指标的 Prometheus 导出器
# 注意: 防火墙要对Prometheus服务器开放9100端口
### END INIT INFO

RETVAL=0
PROG="node_exporter"
EXEC="/usr/local/bin/node_exporter"
LOCKFILE="/var/lock/subsys/$PROG"
LOGFILE="/var/log/node_exporter.log"
OPTIONS="--web.listen-address=:9100"

# 确保锁文件目录存在
[ -d /var/lock/subsys ] || mkdir -p /var/lock/subsys

# 加载系统初始化函数库
if [ -f /etc/rc.d/init.d/functions ]; then
. /etc/rc.d/init.d/functions
else
echo "错误: /etc/rc.d/init.d/functions 文件不存在"
exit 1
fi

start() {
if [ -f $LOCKFILE ]; then
echo "$PROG 已经在运行!"
return 1
fi

echo -n $"正在启动 $PROG: "

# 安全启动方案:通过 sudo 切换用户并重定向日志
sudo -u node_exporter nohup $EXEC $OPTIONS >> $LOGFILE 2>&1 &
RETVAL=$?

[ $RETVAL -eq 0 ] && touch $LOCKFILE && success || failure
echo
return $RETVAL
}

stop() {
echo -n $"正在停止 $PROG: "
killproc $EXEC
RETVAL=$?
[ $RETVAL -eq 0 ] && rm -f $LOCKFILE && success || failure
echo
return $RETVAL
}

restart() {
stop
sleep 2
start
}

case "$1" in
start) start ;;
stop) stop ;;
restart) restart ;;
status) status $PROG ;;
*) echo "用法: $0 {start|stop|restart|status}"; exit 1 ;;
esac

exit $RETVAL

部署验证步骤

1
2
3
4
5
6
7
8
9
10
11
12
13
14
15
16
17
18
19
20
21
22
23
24
25
# 设置执行权限
chmod +x /etc/init.d/node_exporter

# 创建日志文件并授权
touch /var/log/node_exporter.log
chown node_exporter:node_exporter /var/log/node_exporter.log

# 配置开机启动
chkconfig --add node_exporter
chkconfig node_exporter on

# 启动服务
service node_exporter start

# 验证服务状态
service node_exporter status

# 检查端口监听
netstat -tlnp | grep 9100

# 查看日志
tail -f /var/log/node_exporter.log

# 测试指标采集
curl -s http://127.0.0.1:9100/metrics | head -n 5

修改Prometheus配置

vim /opt/prometheus/prometheus/prometheus.yml

1
2
3
4
# 加入一下配置  cssx_hg_game 是组名
- job_name: 'cssx_hg_game'
static_configs:
- targets: ['IP:9100']

生产环境监控指标建议

1
2
3
4
5
6
7
8
9
10
11
# CPU 使用率
100 - (avg by (instance) (rate(node_cpu_seconds_total{mode="idle"}[5m])) * 100)

# 内存使用率
(node_memory_MemTotal_bytes - node_memory_MemAvailable_bytes) / node_memory_MemTotal_bytes * 100

# 磁盘空间使用率
100 - (node_filesystem_avail_bytes{mountpoint="/",fstype!="tmpfs"} / node_filesystem_size_bytes{mountpoint="/"} * 100)

# 网络丢包率
rate(node_network_receive_drop_total[5m]) > 0

常见问题处理

现象排查命令解决方案
指标无法采集curl -v http://localhost:9100/metrics检查服务是否运行/防火墙规则
Prometheus 无数据curl http://localhost:9090/api/v1/targets检查 target 的 health 状态
高资源占用top -p $(pgrep node_exporter)限制采集器 --no-collector.<name>

Gitee安装

Gitee仓库地址:https://gitee.com/jerrryWang/prometheus

前置条件

  • Linux 系统(CentOS 7+/Ubuntu 18.04+)
  • root 权限

快速部署指南

1
2
3
4
5
6
7
8
9
10
11
12
13
14
15
16
17
18
19
20
21
22
23
24
25
26
27
28
29
# 克隆仓库
cd /opt/ && git clone https://gitee.com/jerrryWang/prometheus.git

# 创建专用系统用户
useradd -M -s /usr/sbin/nologin prometheus

# 创建数据目录结构
mkdir -p /opt/prometheus/{prometheus/data,alertmanager/data,grafana/{data,logs},node_exporter/data}

# 设置目录权限
chown -R prometheus:prometheus /opt/prometheus

# 复制systemd服务文件
cp /opt/prometheus/*.service /etc/systemd/system/

# 重载服务配置
systemctl daemon-reload

# 启动所有服务
systemctl enable --now {prometheus,alertmanager,grafana,node_exporter}

# 验证服务状态
ss -tunlp | grep -E "9090|9093|3000|9100"

# 查看服务状态
systemctl status prometheus alertmanager grafana node_exporter

# 热重载配置(Prometheus)
curl -X POST http://localhost:9090/-/reload

⚠️ 注意事项

开放防火墙端口9090|9093|3000|9100

💡 提示:部署完成后请及时修改Grafana默认密码!

学习资源